DIY Steampunk Teacup Holster. Template and Tutorial

Have you ever been out in the woods, and just really wanted to have a cup of tea? from a teacup? Well, now you can, and with style to boot! Grab your teacup holster, load it with a cup and saucer, lock in a spoon and sugar vial, and you are prepared to have your tea anytime. anywhere.
I absolutely love this project because it is a quick build, and can be made using only one sheet of 12 x 18 inch foam! When it is done, it is a surefire conversation piece and the perfect addition to any steampunk costume.
This is a super quick overview of how to make a steampunk teacup holster, but for more detailed instructions, you can buy the pattern, or watch the tutorial video .
It All Starts With a Cup

Make sure the handle of your teacup doesn’t interfere with the saucer.
The first thing you need to do is select your teacup and saucer. You want to make sure your teacup can sit upside down on the saucer without the handle contacting the saucer, and you need a teacup with a base that narrows down so it is smaller than the cup. If the cup base is too large, it will be tricky to have it held securely in place by its strap.

Teacup with a perfect little bottom!
Find Some Fantastic Foam
There’s a few supplies you’ll want to have to complete this project, and one of the most important is the foam you will be using. For the teacup holster, you want to use foam that’s stronger than the stuff available at a craft store. I love Cosplay Apprentice’s What the Foam. It is really strong and easy to work with. If you are making the smaller cup size, all your pattern pieces can fit on one sheet of 2mm thick 12” x 18” foam. If you are making the larger size you will need two sheets.
Other supplies you will want:
The Pattern: You can get it in my pattern shop.
Paint Pen or Gel Pen, Ruler and Scissors
Very Sharp Knife: I use a surgical scalpel or utility knife. Use a brand new blade.
Contact Cement: A small tube is plenty. Make sure you use it in a place with good ventilation and wear a respirator.
Heat Gun or Blowdryer: Used for heating and forming the foam.
Leather Punch: around 2 mm diameter
Paints: I used burnt umber as a base, with raw sienna and black for highlights/lowlights, and finally a metallic paint for the brass parts.
Rubber Gloves: To wear while applying the metallic paints
5 minute 2 part Epoxy: (optional) used for making fake rivets.
Test Tube (optional): Make sure you get a plastic one. I also cut up a cork to replace the original
stopper.
Small Spoon (optional): For tea stirring

Tracing the Pattern onto EVA foam sheet.
Cut it UP
Like I said before, this is a pretty straightforward pattern to follow. Once you have the pattern printed and cut out, you can trace the parts onto your sheet of foam. Then it’s just a matter of cutting along those lines with your super sharp knife until you have all your foam pieces!
Get Gluing

Using the teacup to position the cradle
Once all the pieces are cut out, it’s gluing time! I normally use hot glue for most of my projects, however for added security on this one, I used contact cement. Just make sure if you use contact cement, that you use a respirator and have good ventilation- that stuff is nasty for your lungs!
The front gets glued to the back around the edges, then the cradle that holds the teacup in place gets made. It has a fantastic swirly ornamental strip that can also be a test of ones patience with a knife, however it is completely optional so feel free to accept or decline that little challenge!

Forming the foam around the saucer with a heatgun.
One of the many great things about What the Foam is its ability to be heat formed. With the cup and saucer in place on the teacup holster, you can heat up the foam with a heat gun and use your hands to form the foam around the saucer’s contours.
You could stop here… but why?
The straps that create the beltloops of the holster are added next. I created them to be made separately in order to allow the pattern to fit on a smaller sheet of foam, as well as adding some interesting detail to the holster.

Teacup holster with belt loops and cup retainer.
Next comes the Cup Retainer- made from the two “Y” shaped pieces which get glued together to create a notch that holds the bottom of the cup nice and snugly. I know a lot of other teacup holsters out there use a simple strap through the handle of the teacup to hold the cup into the holster, however I have noticed that particular system allows the weight of the cup to pull the front of the holster away from the wearer. Instead, with this system, the cup is clamped right up against the saucer, making for a much less floppy and awkward wearing experience.
Add Accoutrements
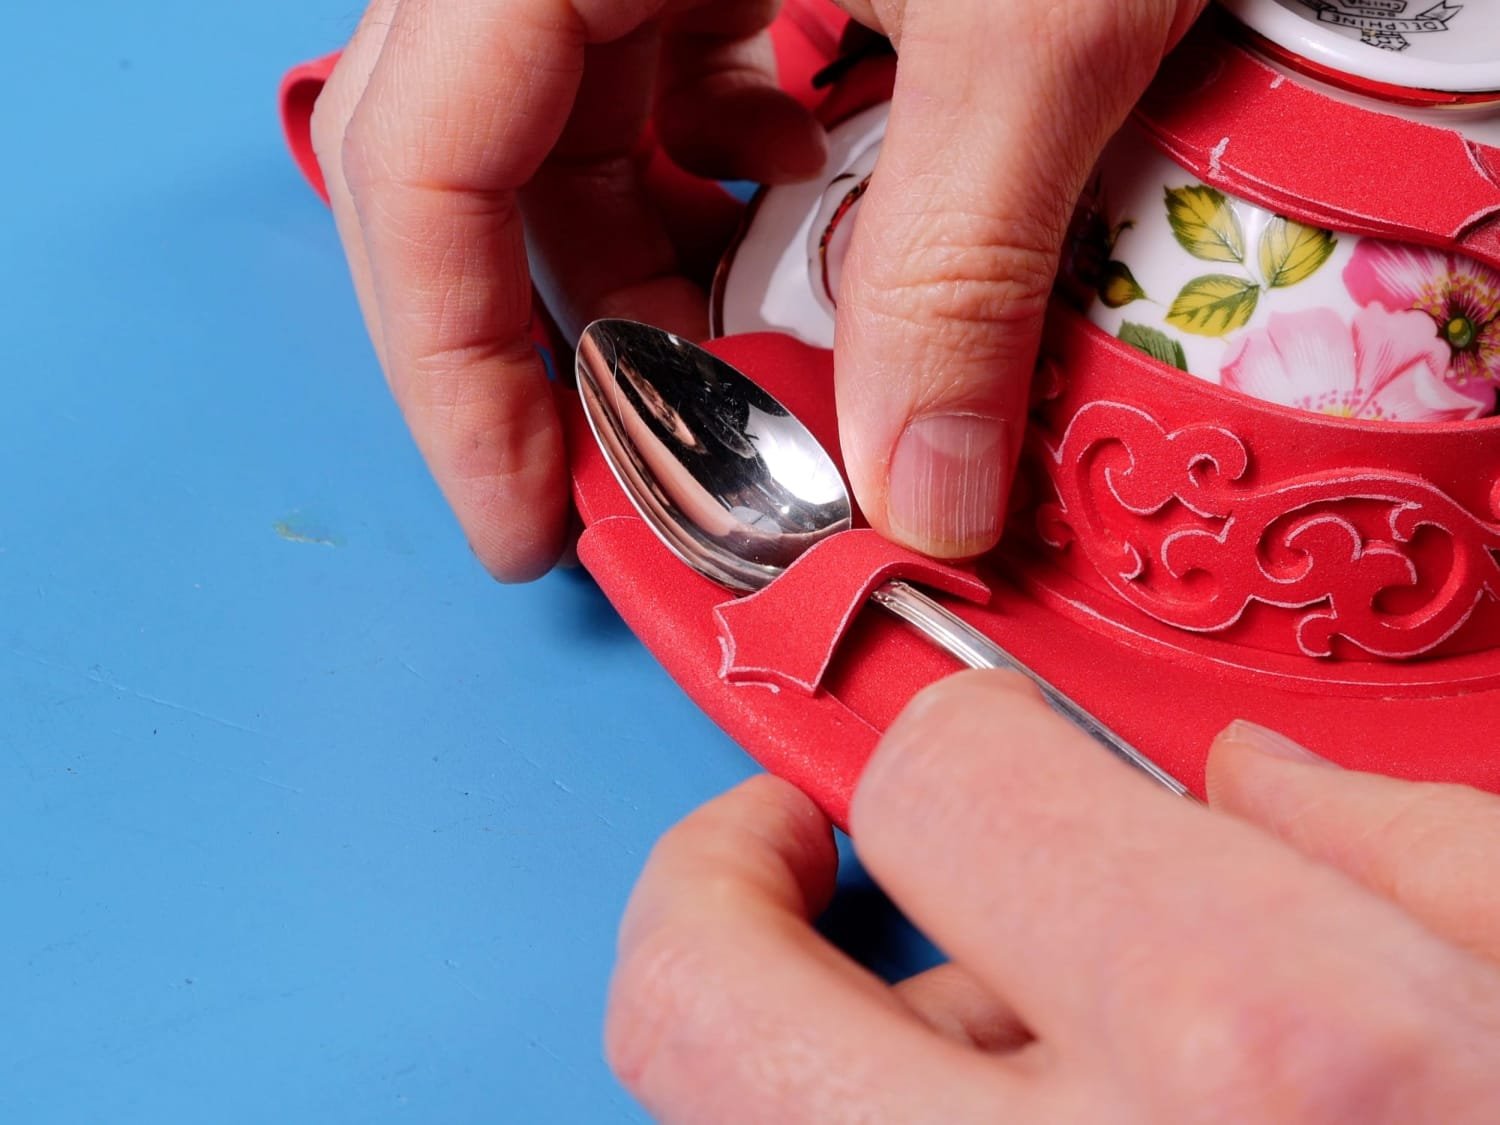
Adding a teaspoon to the holster.
If you want a simple steampunk teacup holster, you could call it quits right now, paint it up, and still create a stir when you walk into a roomful of tea lovers. There is, of course still lots of potential to add some extra special detailing, so on we go!

A little sugar for some extra sweetness!
Add a teaspoon tab on one side so that you always have a stirring utensil at hand. If you like a bit of sugar in your tea, there’s still room on the other side for a test tube filled with those sweet, sweet crystals.

Adding Faux rivets to the teacup holster using two part epoxy.
Rivets are a great addition to most steampunk projects, they are not as in your face as throwing a bunch of gears on something, but they do add that extra detail that makes a project pop. My favourite way of creating faux rivets is to use 5 minute 2 part epoxy. I mix it well and then use the head of a match to make small blobs wherever I want a rivet. It takes a fair deal of practice, however I feel like I always get the best results with with that technique. Check out my tutorial: 8 other ways you can make fake rivets, - it’s a great resource if you want to try some easier ways to make rivets on your project.
Paint it Up
Your paint job can easily make or break your project, so plan to spend as much time painting as you did making! Also, after saying that, I should also say not to stress, because if you mess up, you can always paint over it again and have another try!
For this one we are going to try and make the foam look like it’s actually leather. Start by painting everything with at least two coats of a dark brown paint (I used Plaid FX “Charred Root) Let it dry completely
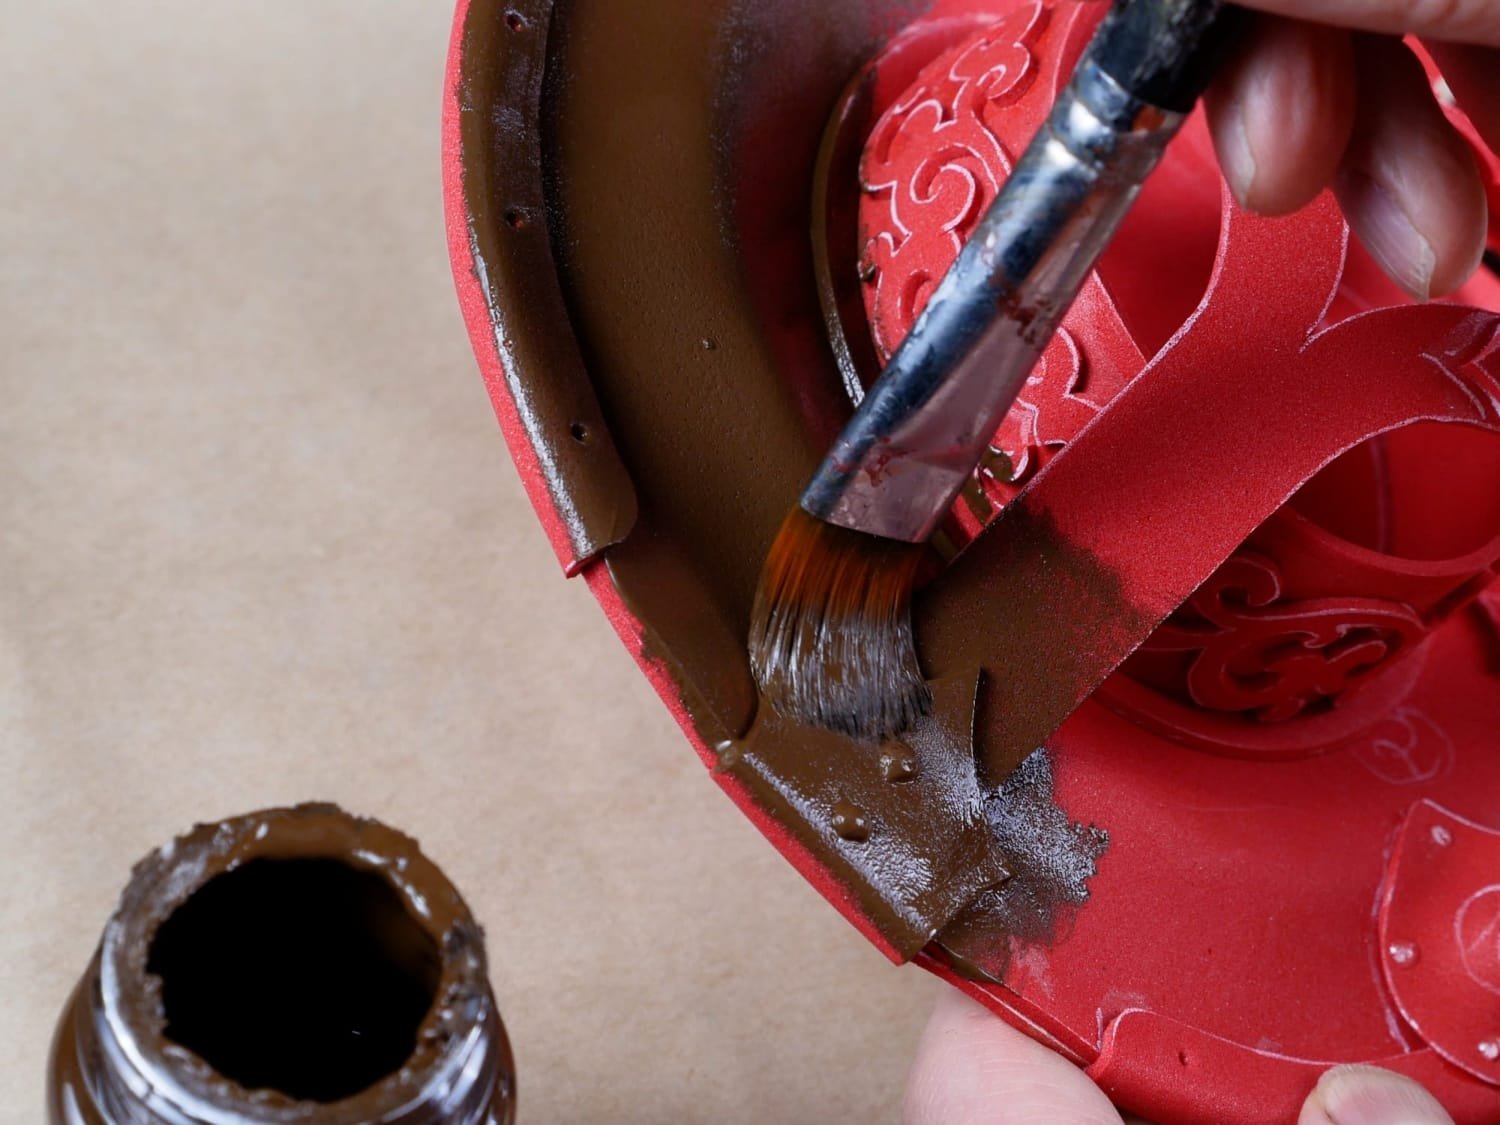
Giving a couple good coats of dark brown base paint.

Adding some raw sienna highlights.

Next you want to use a lighter brown to add highlights on the leather (I used Liquitex Basics Raw Sienna). Make a little cloth pad by folding up an old rag like a t-shirt. Dip it in a little bit of lighter brown paint and then dab it on some scrap paper until there is almost no paint coming off the pad.
Rub the pad on the holster, concentrating on raised areas, slowly building up a slightly uneven layer of lighter color. You don’t want the colour to cover completely, just enough to give a bit of texture and character. I recommend starting on the back to get the feel for the paint and surface you are working on. Once you’ve got it perfected, move on to the front.

Add a bit of grunge with black paint for that worn look.
I also like to add some darker areas. When you see some really well used leather, the edges can be quite dark from body oils and dirt getting into it. That’s what we are trying to recreate with paint.
Use the same technique you used with the lighter paint, but just use a bit of cloth over your finger (wear a glove if you don’t want you finger to end up black) Take it really slow, it’s super easy to get too much black in a spot. I applied the black on as many of the raised edges as I could get my hands on.
Lastly, I added some brass accents. I feel the brass looks the best on a black background, so I painted everything black that I wanted to end up like brass. It does still work over the brown if you want to give that a try too. Once the black paint is dry, put on a rubber glove and do the same thing with the brass paint as you did with the other colours. Put a little on your finger and then rub almost all of it off on some cardboard. Rub your finger over all the areas you want to look like antique brass. The goal here isn’t to get total coverage, in fact you want to get the paint on all the raised areas but leave the recesses dark. This is want gives the antique look.

Rubbing some brass paint over a black background.
And that’s it, now you can slide that holster onto your belt and get out there and drink some tea!!

Looking for more steampunk costume ideas and patterns? You can find more here:
Subscribe to my YouTube Channel
Follow me on Instagram
Check out my pattern shop