Hansmaker D1 Ultra Review
Review video I made for the Hansmaker D1 Ultra
Is the Hansmaker D1 Ultra the Laser you need to make your life worth living? I got one to try out and here’s what I think….
First off, I need to make clear that the D1 Ultra I received was a prototype version, so there may be improvements in the actual production version. Also, full disclosure, I received the laser for free but Hansmaker did not pay me anything to make this review.
The D1 Ultra is a combination 20Watt diode laser and 30 Watt fibre laser, so it should have a wide variety of items it can mark and cut. Diode lasers tend to work well with wood, leather, EVA foam, coloured paper, and fiber lasers are great for stainless steel, brass, aluminum, and slate to name a few. It is also a Galvo laser, which means that instead of a laser head moving about on a track, the laser stays stationary, and a combination of mirrors and lenses direct the beam from quite a significant distance away. This means a few things:
The work area is generally smaller than on a flatbed laser
Because there are no moving parts at the level of cut, you can engrave odd shaped objects you wouldn’t be able to on a flatbed
It isn’t really possible to have an air assist, meaning there might be more smoke interfering with the laser beam
If you are cutting with the laser, the edges of the cut will be less vertical the farther out to the edge the cut is.
It is easier to secure light items to the work surface because you can just add a weight on top and it won’t interfere.
Cutting Cardboard
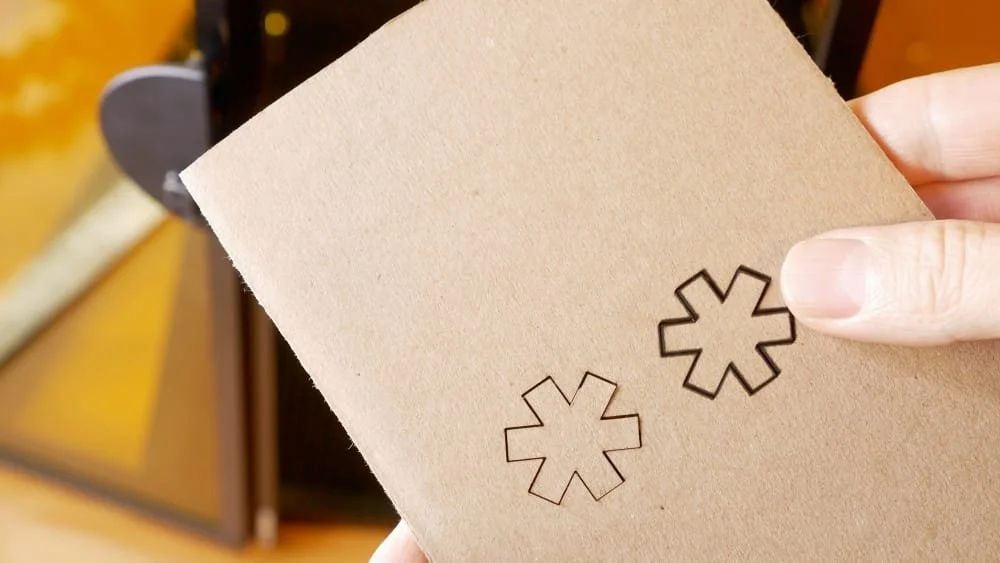
Fiber laser on the left and diode laser on the right.
First off, if you are looking for a laser to do a lot of cutting with, I would recommend a flatbed laser. With a flatbed laser you will get perfectly vertical cuts all the time, and you have air assist as well to keep the cut clean. That said, I tried cutting some 3mm thick corrugated cardboard with the D1 Ultra, and it worked reasonable well once I got it tuned in. At least is worked reasonably well with the fiber laser. Comparing the cut from the fiber laser and the diode laser, the fibre had a clean cut with a thin kerf while the diode laser tended to scorch the cardboard around the cut and removed more material along the cut line.
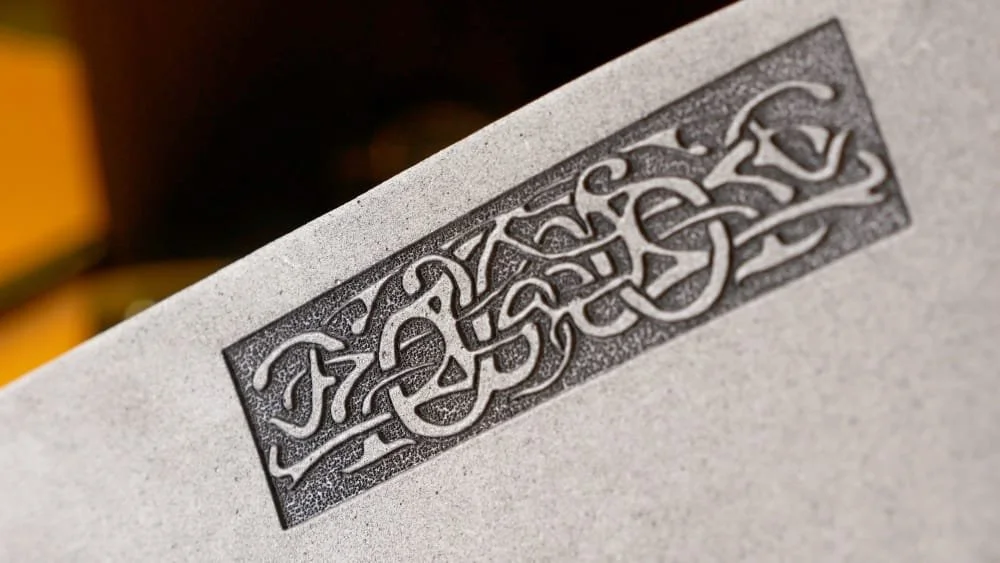
Marking Slate

Bitmap image used to mark slate coaster. 12 minutes to complete.
The Fiber laser worked a treat for marking slate coasters. I tried two different images, the first one was a bitmap image of my favourite fruit mug, and it took about 12 minutes to complete. I then did another engraving using my logo as the image, but this time it was a vector image. That took only 41 seconds to complete. The image was a similar size to the fruit mug one, so I am not sure why the vast difference in time, but it looks like it would pay to take the time to convert your image into a vector if you know how to do that. This only would work for images that are limited to black and white- no grayscale.
Marking Stainless Steel

Fiber lasers are where it’s at when it comes to marking and engraving metals. The first thing I tried was to mark a stainless steel knife blade. This is a good example of what you can do with a salvo laser vs a flatbed one. The knife has a handle as well as a little knob that protrude, so a flatbed laser would run into those and knock the knife. The D1 Ultra, however has no problem working around these obstacles to be able to engrave the whole knife blade.
The engraving turned out well on the steel, giving nice crisp black markings, however they didn’t seem to go very deep into the metal. I later found out that it helps to change the focus when engraving on metals, but more about that later.
Engraving Brass
I was getting very frustrated trying to get any decent marking on brass using the fiber laser. I tried all kinds of things, but eventually contacted Hansmaker, thinking my laser was faulty. They suggested manually adjusting the focus closer to the brass until I could see sparks, meaning it was at the right focus for engraving the brass. I followed the instructions and sure enough, once I had dialled the focus about 6.5mm closer, I started seeing a shiny point of light as well as hearing a sort of hissing noise, indicating the laser was now actually vaporizing the brass. I was able to do a deep engraving of a spider- the engraving is just a little larger than my fingernail, but you can see how much detail the laser can achieve when you look at the tiny little leg joints.

Excellent detail in the spiders leg joints.
It was good to finally get a grip on engraving brass, however it also came with an issue that I haven’t been able to resolve. When you adjust the focus manually, it throws the coordination between the laser and the camera out of whack. So where you see the image preview on the camera screen, isn’t exactly where the laser is going to engrave. On my machine it was about 2mm off to the side and 1mm above. This is really a problem, as the whole point of a laser like this is being able to put a few pieces down on the base, use the camera view to line up all the images and then engrave. If you are always needing to mess around with trial and error, the whole practicality of the system fails. I did contact Hansmaker, and they said there was nothing I could do about it at home, but say this can only be fully fixed by adjusting the divergence angle of the fiber laser’s beam expander. The other problem that adds to the frustration is that the preview that can be generated by the laser to help you line up your engraving, only shows a rectangular bounding box of the engraving. So, if I am going to engrave a circle or odd shaped design and then turn on the preview, the laser will project an outline of the cut, but it will only be a rectangular outline.
Cutting and Engraving EVA Foam
Single pass engraving on EVA foam
The D1 Ultra did a fantastic job of single level engraving on foam. in just a few seconds I was able to create a design in the foam that was recessed about 1mm deep and was nice and clean and perfect. I did also do some cutting tests on foam with the diode laser, and although it did cut through the foam, it cut quite a wide line as it went, so if you were cutting anything that required specific sizes, this would not work well for that.
What This Laser Does Well
Two different types of lasers cover a very wide range of materials you would want to engrave
For jobs that don’t require maximum power, the laser has the ability to move very fast
Easy to set up your materials on the base- you can hold them down without worrying about the laser running into them
Very fine detail possible on brass deep engravings such as for coins or medals
excellent exhaust fan
It is super easy to update the firmware
Can change focus manually while in the middle of a cut
What This Laser Does Not Do Well
Mechanical shortcomings (on my pre production model):
Safety shut off when the doors open does not trigger until doors are almost fully open
Interior light is not very strong
the two laser dots used for manual focusing do not line up at the focal point, so they are useless
The compression rings to attach the exhaust hose are the wrong size
Software Shortcomings:
There is no ability to easily set up a test grid
You cannot constrain the proportions of an image when you drag a corner to resize, instead you have to type in the size in the scale box on the software. This means a lot of guess and check to get the image the right size.
When importing vector images they can come in a bit messed up
limited undos (I think around 10)
Unable to adjust the frequency of the laser
The preview option is bounding box only
Can’t pause and restart cut
No time estimate for the cut or remaining time shown
Software is not usable while a cut is in progress
Camera view is out of alignment if the engraving is at a different height than the preset focal point of the laser
Conclusion
The Hansmaker D1 Ultra seems to be a capable laser but it is hindered by some rather annoying faults. As a good number of folks would be looking at this machine with the intent to engrave brass: such as coins, or dog tags or medals, the fact that the focal height needs to be brought down, throwing off the camera view would be such a nuisance and would likely result in a lot of failed jobs. It seems like a pretty large deal breaker to me. All the software issues, while annoying right now, have the potential of being fixed, so I would be prepared to give a bit of grace on those as long as Hansmaker continues to update it. I will say that they have already updated a couple of times since I received the machine, so I think they really are trying to make this into a decent offering.