How to Make a Steampunk Mad Hatter Top Hat
Powered by the wind…and your imagination…

My goal for this project was to create a whimsical hat that would stand out in a crowd. I settled on the concept of a wind-powered top hat. I am not sure exactly why you would need a power supply in a hat, but hey, that's what imaginations are for! Obviously, the propeller in this hat is not actually powering anything, but it should look cool, spinning up a storm as you walk into the wind!
I am using my flared top hat pattern as the base for this project, but you could also use a different style of hat, it just has to be tall enough so a tube can fit through above your head.
I’ve made a video showing how I made the hat or you’d rather have the instructions in print form…keep reading!

Here are the tools and materials I used:
Pattern for the Flared Top Hat: I used the one that I created.
3D Printable Files: The propeller assembly can be found here on Thingiverse.
5-8 mm thick EVA Foam: I used foam from a cheap camping mat.
2 mm EVA Craft Foam: One 30 x 45cm (12" x18") sheet should be enough
Super Glue
Glue: Either contact cement or hot glue. I love my hot glue gun (paid link) because it has an adjustable temperature. I like to use it at as low a temp as possible so that the glue cools quickly.
Cutting Surface
Gluing Surface: I absolutely love using a silicone baking sheet. Nothing sticks to it.
Sharp Knife: If it is not really sharp you will have a terrible time when you are cutting the foam. I like to use a scalpel.
Pen: I used a silver gel pen so that the ink wouldn't bleed through the paint.
Scissors
Paint: I used Liquitex Basics Mars Black, Plaid FX Smooth SatinCarbon and DecoArt Americana DecorPewter, Silver, and Vintage Brass
Rubber Gloves
12 mm and 6 mm leather punches
Heat Gun: For curving the brim of the hat and forming the back swirly piece
Please note, some of the above links are Amazon affiliate links, and I do get a small commission if you buy through these links. It doesn't cost you any more and it helps me out!
Step 1: Safety First!
It's fun to get started, but you want to stay safe so that you can enjoy your amazing creation!
Sharp knives and hot glue can cause injury if used improperly. Be sure to use in accordance with the manufacturer's instructions.
Some EVA foam contains a chemical called formamide. There are some people that say there isn't enough formamide in EVA mats to be harmful, and others that say there is. Do your research and come to your own conclusions. At the least, I would say it is a good idea to open your foam mat up and let it sit in the sun for a day or two, as most of the chemical will off-gas from the foam. Or buy foam that is labeled formamide free.
Step 2: Let's Get This Pattern Started!

Use a measuring tape to measure your head in centimeters where the hat will sit. Find the corresponding size pattern pieces. If your head is larger than the size indicated, go to the next size up.
You will need to print the pattern from the PDF. Make sure the scale is set to "actual size" or 100% in the printer dialogue box of the software you are using to print. You can check if it has printed properly by measuring the print guides afterward. Note, there are three band pieces for each size of hat, so you will only need to print the bands that are your size.
Once printed, some of the sheets of paper will need to be taped together to create the patterns for the brim and the top of the hat. For these, line up the “+” shaped marks, and tape the sheets together. I like to tape the pieces together on a window so that I can see through the paper easily.
Step 3: Cut and Trace...
Cut the pattern out of the paper, cutting as close to the line as you can without removing the line.

Place the brim and top patterns on the foam and trace around them with the ballpoint pen, holding them firmly so that they don’t move while being traced. They have lines that show the halfway marks for both front and back as well as side to side. It is important to mark these to help with alignment later. You can mark them on the outside of the pattern, and then, once you remove the pattern, remember to extend the marks to the inside of the pattern so they are still visible once the foam is cut.
Now trace the three pieces that will make up the band of the hat.
You will need to trace piece A twice, and pieces B and C four times each. I trace B and C twice with the pattern pieces right side up and mark them B1 and C1 then I flip the pattern pieces over and trace B and C another two times each and label these as B2 and C2. You should end up with a total of 10 band pieces.
Step 4: ....and Cut

Okay, before you cut anything, I need to emphasize the importance of having a really, really sharp knife! If your knife isn't sharp, the foam is going to tear and cause you to pull out your hair in frustration!! If you are using foam that isn't very dense (like the camping mat I am using here) this will be even more of a problem. I recommend buying a surgical scalpel handle and a box of blades so that you can change blades whenever the blade loses its ultra-sharp edge.

Cutting the top oval at an angle so it fits into the band
Take your sharp knife and carefully cut out the pieces, cutting right down the centre of the pen line.
On the top piece, cut with the bottom of your knife blade angled in towards the centre of the foam piece. This will help the top piece fit nicely into the flared band.
Step 5: Choose Your Glue Wisely.....
Contact cement is likely the most common glue used when working with EVA foam, but in this tutorial, I will show the process using hot glue. Contact cement tends to give a cleaner result, however, it is not a good idea to use contact cement in an enclosed space without ventilation, which is why I have transitioned over to using mainly hot glue. You only have one set of lungs, so make sure to treat them with care!!
If you are using contact cement:
Spread the cement on both edges that you are planning to glue together. Wait until the glue is no longer tacky, and then press the edges together. They should stick instantly and permanently together.
If you are using hot glue:

If you use hot glue, just glue a small section at a time and hold it together while also pressing the seam down onto your gluing surface. Hold it until the glue cools. Then move on to the next section. This is a lot faster if you use a glue gun with adjustable temperature control because you can set the gun to a low temperature so you don't have to hold the pieces together as long, not to mention you will get fewer burnt fingers!
As you get used to your glue gun, you can also try wiping the glue off the seam just as it gets cool, giving you a nice clean seam. Just be careful not to burn yourself on glue that is still hot!
Another tip for clean hot glue seams is to rub vigorously over top of the seam after the glue has completely cooled with some scrap foam to clean it up (this only works well with medium to high-density EVA foam). I have a little video about getting nice hot glue seams that you can watch here.
I have changed my technique over time and find it easiest to glue with the finished side up rather than down against the silicone mat. I just use a well-timed wipe to remove excess glue on the seam.
If you use hot glue, be careful not to leave it in a hot car because the glue will melt, leaving you with a hot mess!
Step 6: Make a Band
Set up your pieces as shown in the photo below, so that you know how the pieces will go together.
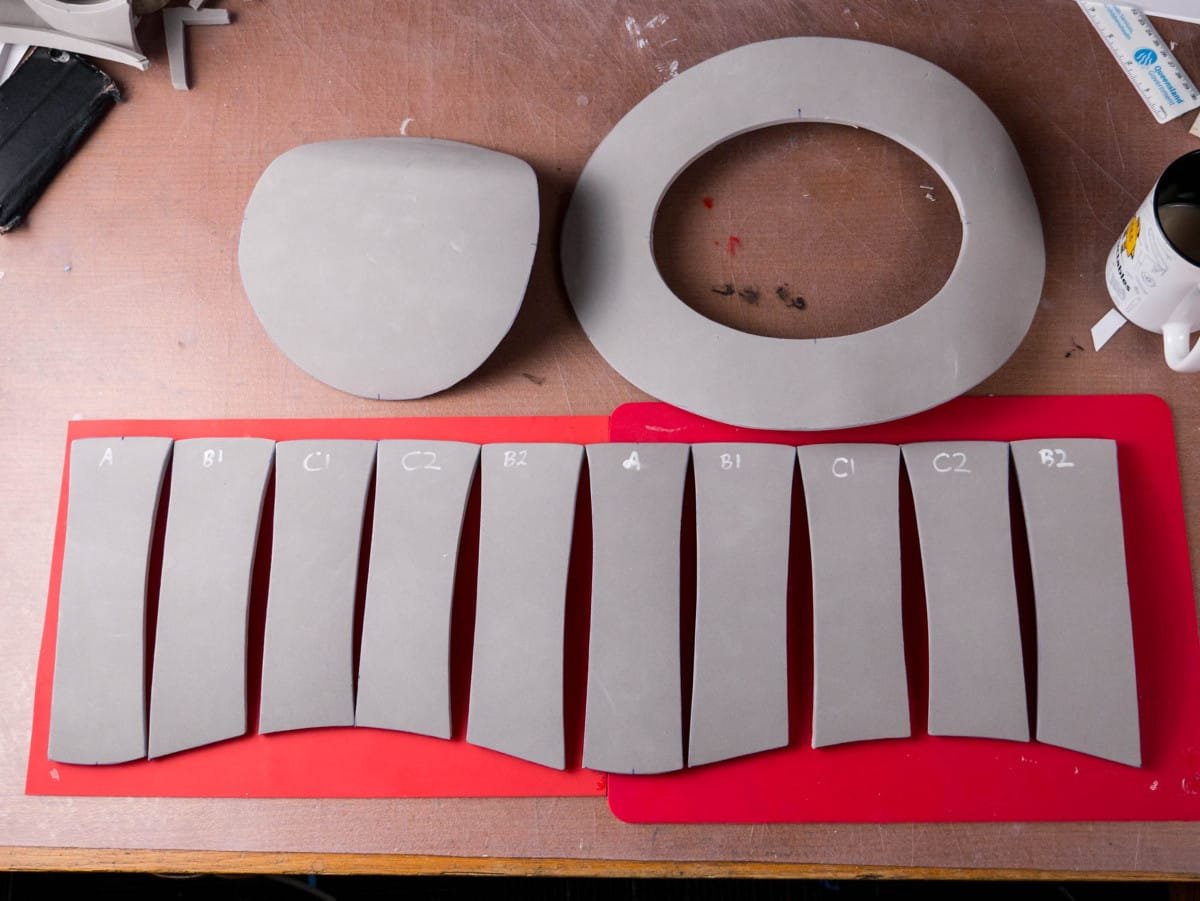
All the pieces for the flared top hat, ready to be assembled
The order they should be is: A-B1-C1-C2-B2-A-B1-C1-C2-B2
Using your glue gun, apply glue to the first 5 cm of piece A and then hold piece A and piece B1 together until the glue cools. Keep repeating the gluing process a little at a time until all the pieces are glued together. You will end up with a long, wavy strip of foam.
Take the two ends of the foam strip and glue them together to create the completed band.
*Note: You don't have to get too worried if the seams are a little messy here. If you are following this tutorial, you will later be covering each seam with another strip of foam.
Step 7: Add the Brim
Line up the centre line on the brim with the centre of piece A. Glue piece A to the brim at the front and then again at the back. Then find the centre of one side and tack that in place with some glue. Now glue the remaining sections of the brim.

Using the alignment marks to glue the brim
You may find at first that it looks like the brim is not going to fit properly on the band, but usually if you do it this way you can even out any extra space and once you get the foam glued in, it either compresses or expands to fit nicely. That is the great thing about using a material as malleable as foam, it allows for variance in cutting and still ends up working out O.K.
Sometimes the brim can have a bit of a mind of its own, especially if it comes from a tightly rolled foam mat. If that's the case, you can use heat to form it into a pleasing shape. Grab your heat gun or a blow dryer, and heat the brim lightly. Use your hands to form the brim while it is warm, and once it is cool it will hold its shape. If you used hot glue, don't heat it too much or the glue seams will come apart!!
Step 8: Add the Top

Gluing the top of the hat
This is similar to gluing the brim. Start at the front centre, then back centre, then the two sides, and then all the rest. Pretty simple really.
Step 9: Designing the Propeller System

All the different 3D printed propellers and hat parts
In the past whenever I have made a costume, I have made it from EVA foam and easily found objects. For this one, I wanted to make a propeller that could actually spin, so I decided I needed to 3D print those parts. I know owning a 3D printer is still not super common at this point, but it is getting more and more accessible for the average maker, not to mention that there are also companies that will print your files and send you the finished piece.
I kind of got a little carried away when I was designing these because I wanted to try a few different configurations and see which I liked best. So, I created two different propeller ducts, one with curved walls to match the contours of the hat, and one thinner and flat. I also made hubs with holes for 4,5,6 and 8 fan blades. So, yeah, lots of options for all sorts of projects beyond this specific hat.
If you'd like to make use of the 3D files I designed for this project, they are available for free on Thingiverse.
Step 10: Spend a Few Hours 3D Printing


Now it is time to print up all the bits and pieces!
I printed the parts using PLA filament.
I used 0.1 mm layer heights for all the smaller parts, and 0.2 mm layer height for the prop ducts and the round swirl piece.
Thes are the pieces I printed from the 3D files. There are extra files included as well if you would like more blades or a prop that rotates in a clockwise direction.
1x prop duct curved
1x prop duct flat
4x prop Blade CCW
1x hub 4 blades CCW
1x Swirl Portal
1x regulator
3x wire connector base
1x wire connector long
2x wire connector short
1x spindle cap
Step 11: Install the Propeller Ducts
Press the curved side of the larger prop duct against the front of the top hat where you would like the hole to be located. Remember that you need to have room for your head in the hat, so if you install the prop too low, your head will bump into the tube that goes across the centre.

Cut the hole into the hat. The tendency when cutting is to keep the knife perpendicular to the foam as you cut the left and right sides of the hole, but that will leave you with a hole that flares out on the sides. Instead, you will want to keep the blade perpendicular to an imaginary plane through the center of the hat. This way the prop duct will fit flush with the edges of the hole.
Measure down from the top of the hat to the top of the hole on the front, and use this measurement to locate a second hole on the back of the hat.
Step 12: Assemble 3D Printed Parts
Test to make sure the prop blades fit into the holes around the outside of the hub. For me, they fit perfectly with a little bit of force, however, your 3D printer may print differently so you may need to trim the pegs on the prop blades if they don't fit in the holes.

Superglue the prop blades into the holes in the center hub.
Glue the wire connectors onto the wire connector bases.
Glue the "prop duct curved" to the "prop duct flat", lining them up back to back so that they match
My original idea was to have a propeller on the outside and a propeller on the inside of the fan duct, spinning the opposite direction, which is why both pieces have a spindle. Sadly, I found that having both props reduced the airflow too much and neither would spin properly.
Step 13: Sanding

Sand all the 3D printed pieces to get rid of any bumps and lumps that shouldn't be there.
I used 80 grit wet/dry sandpaper first and then 180 grit wet/dry to smooth out the marks from the previous paper.
Use water with the sandpaper to keep the plastic from softening due to friction, as well as keeping your lungs from breathing in tiny plastic particles.
Step 14: Heat Things Up a Little
The absolute best thing about PLA filament is that you can heat it up and it becomes super flexible without becoming sticky or deforming too badly. I love it!

Find a container or other tubular object that has a similar radius to the back of your top hat.
Put on a pair of insulating gloves.
Slowly heat the swirl piece with a heat gun until it gets a little bit floppy. Don't heat it too fast or it could overheat. I had my heat gun set at 340 deg C (650F) but it may depend on the heat gun you use.
Press the floppy swirly piece against the container and let it cool so that it keeps that form.
* The swirly porthole piece is not actually round, it is slightly oval to compensate for the hole in the hat going around a curve. It is important that you bend the porthole piece with the longer dimension going horizontally around the curve.
Step 15: Pre-paint the Internal Bits
Once installed, it will be much harder to paint the inside of the prop duct, so now is the time to do it. I also painted the blades just because I wanted to see how it all looked together.
Paint the entire inside of the prop duct black, except for the spindle and the little round disc right behind the spindle, as these are the places the propeller will contact and we want it to be able to spin freely.

I used artists acrylic paints to paint everything black. The reason I like the acrylics is that they are thicker than sprays, and so cover up some of the sanding marks you may have left behind.
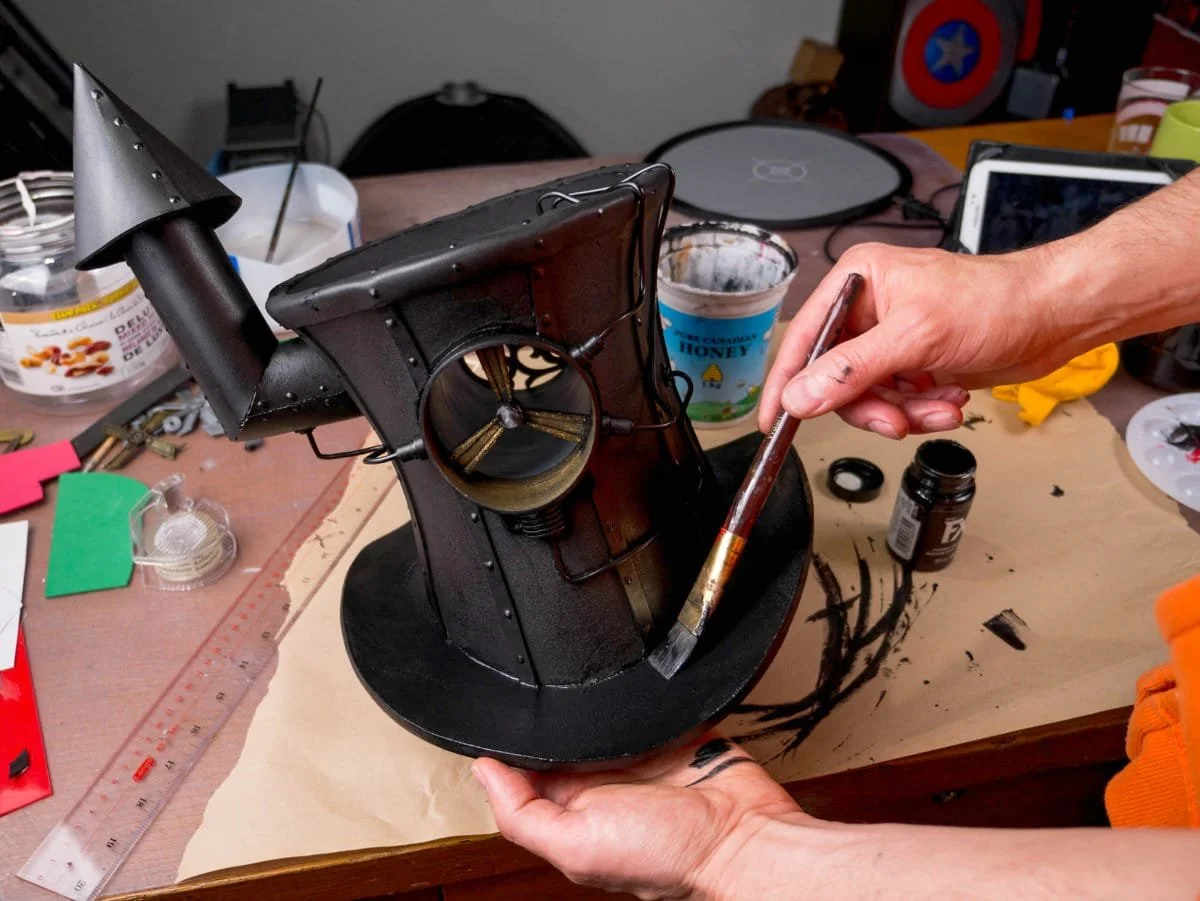
Now it's time to make it look old and brassy! My favorite metallic paints tend to change over time, but right now I am liking DecoArt Americana Decor Metallics Vintage Brass for the brass look.
My technique for creating an antique metal look is as follows:

antique the propeller housing
Put on a tight-fitting rubber glove. This keeps your hands clean and prevents fingerprint smears in your metallic coating.
Put a small blob of metallic paint onto a piece of scrap cardboard or paper.
Dip your fingertip lightly into the paint and then rub it onto a clean section of cardboard.
Rub in a circular motion until almost all the paint is off your finger.
It is especially important to watch the tip of your finger because paint can build up there, so you want to rub off any accumulation that occurs.
Rub your finger on the parts that you want to paint. Slowly build up the metallic colour, repeatedly going back and getting more paint on your finger.
Step 16: Cover the Seams - Vertical Seams
Cut 10 strips of 2 mm thick craft foam that are 1 cm wide (approx 3/4") and slightly longer than the height of your hat.

Glue a strip over each seam. Some of the strips will need the end cut at a slight angle so that it will sit flush against the brim. Also, the strips that go over the back hole will need to be trimmed slightly back from the hole so that the oval swirly piece can sit flush on the hat later on.
Once glued, trim the strips flush with the top of the hat.
Trim the strips where they overlap the front hole.
Step 17: Cover the Top Seam

Cut a strip of 2 mm craft foam 2.5 cm (1") wide, and as long as the circumference of the top of your hat. If you only have small sheets of craft foam, you can connect a few strips together.
Glue the strip around the top of the hat, with half of the strip sticking up past the top.
Now glue the protruding half of the strip, a section at a time, pressing it over the edge and flat against the top. Use your fingers to work it down as flat as possible.
Step 18: Make the Duct Tube
Cut a piece of 2 mm craft foam that is 26 cm (10.2") wide and as long as the top of your hat.
Make sure that it will wrap around the prop duct and meet edge to edge.

Paint the inside silver (or whatever color you like best)
Once the paint is dry, glue the edges together to create a tube.
Push the prop duct into the tube all the way and then cut around the edges of the foam. This will give the front edge of the tube the right contours to butt up flush against the inside edge of the hat.
Step 19: Installing the Propeller Duct

Tube pushed through the hat
Push the prop duct tube in through the two holes, with any excess protruding from the back hole.
The prop duct should be sticking out about 1 cm (3/4") from the front of the hat.
Cut the excess tube off flush around the back hole.
Superglue the prop duct at the front and the tube at the back.
Step 20: Extra Bits and Pieces

Supergluing parts to the top hat.
Superglue the regulator under the prop duct.
Superglue the three wire connectors to the sides of the prop duct as shown in the pictures.
Superglue the swirly porthole in place, covering the back hole.
Step 21: The Smoke Stack
Cut out the smokestack pieces (they are now a part of the flared top hat pattern)
Glue the edges together on the pipe pieces to create a short pipe with two angled ends, and a longer pipe with one angled end.
Overlap the flat edges of the semicircle piece and glue them together to create a cone.

Step 22: Make a Hole

Trace the angled end of one of the smokestack tubes on the side of the hat, near the top.
Cut the hole into the side of the hat.
Step 23: Assemble the Smokestack

Glue the two smokestack tubes together on the angled lines. The edge of the shorter tube you use will determine whether the seam will be facing to the front or the back. I like the seam at the front because it adds to the handmade feel once the rivets are added.
Glue the cone to the top of the smokestack.
Glue the smokestack into place in its hole.
Step 24: Make Some Little Disks

Cut some 12 mm (1/2") and 6 mm (1/4") disks from 2 mm craft foam.
Glue them together in stacks of 2.
Step 25: Wire It Up!

I have a big spool of old telephone wire, so that's what I used on this hat, but you can use whatever is handy.
Glue the wires into the holes in the wire connectors and the generator.
Bend them however you like around the hat and then glue one of the foam disk stacks wherever you would like to terminate the wire.
Use a skewer to make a hole through the disk stack as well as the hat, and superglue the wires into the holes.
Step 26: Fake Rivets
There are lots of different ways to make fake rivets, but this is still my favorite!

Using two-part 5-minute epoxy, squeeze out equal parts and mix them thoroughly. You only want a very small amount of epoxy as it will start to harden in a few minutes.
Dip the head of a wooden match or something similar into the epoxy and lightly touch it against the place where you want your rivet.
Slowly lift the match head away, leaving behind a small blob of epoxy.
As the epoxy cures, it will get thicker until it is leaving long strings behind when you make your dots. This means it is time to make another little batch of epoxy.
As you are working, stay aware of how you are holding the hat and that you aren’t touching rivets that aren’t fully cured.
Put the rivets along all of the upright strips around the hat, the strip around the top, and on each side of the seams on the smokestack pipe and cone.
Step 27: Paint It Black
Paint everything black.
I used Plaid FX paint for this step because it is made to be flexible, specifically for EVA foam. I have used artists acrylics in the past, and they do a pretty good job as well, there is just more chance of getting cracks in the paint if the foam flexes too much.
Give a good three or more coats. The reason for this is that it builds up a smooth-ish surface which will be very helpful when trying to get a nice effect with the metallic paints in the next step.
Step 28: Silvery Goodness

My current preferred silver paint is actually a mix of two paints. It's a 50/50 mix of Decoart Metallics Silver and Pewter.
Apply the silver using the same technique shown in step 15. It takes patience to do a good job, so practice and take your time.
If you accidentally get silver somewhere where you are going to want brass color, it's not a problem, just paint over the silver with black again when you are done and you are good to go for the bronze.
Step 29: Bronze Bits
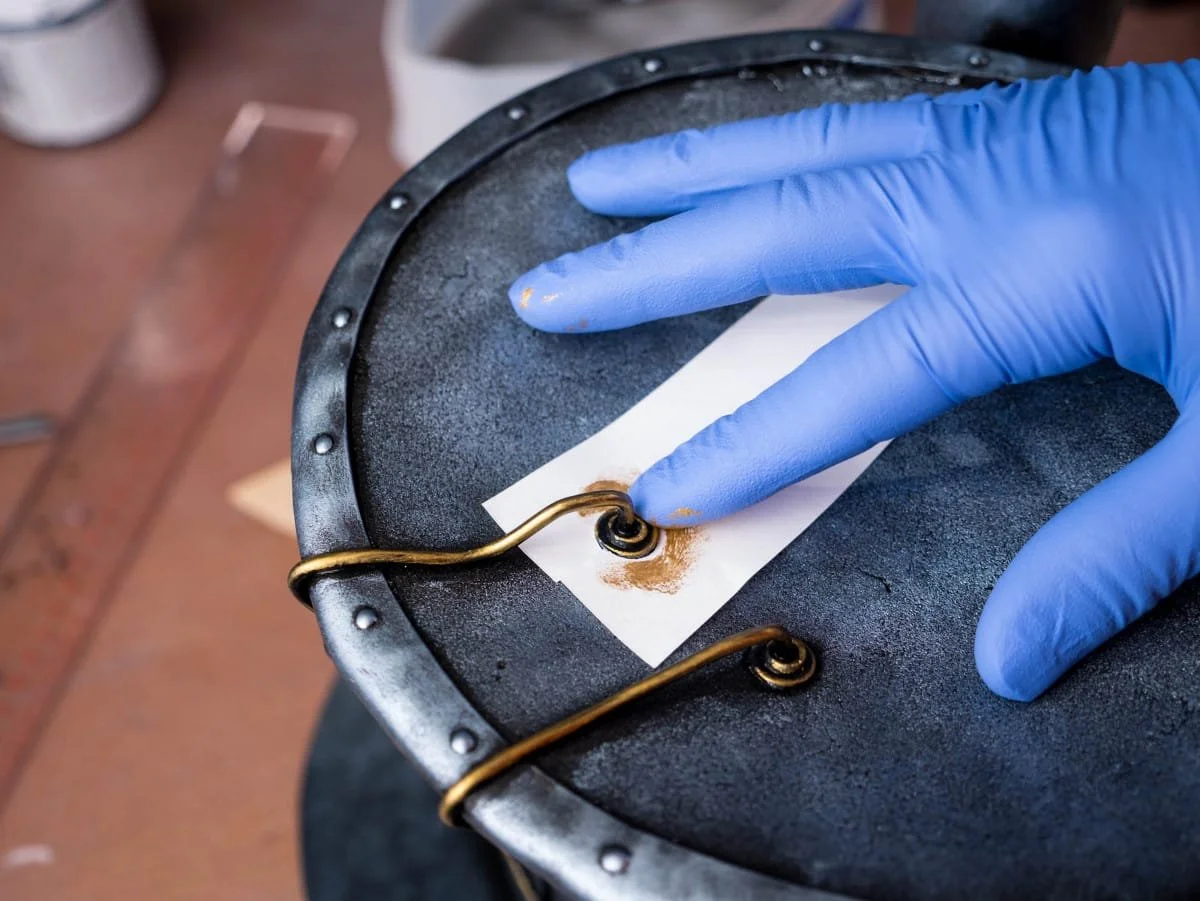
Apply bronze to the wires, the outside of the prop duct, the generator, and the swirly porthole.
The little foam discs where the wires connect to the hat are pretty tricky to paint without getting bronze on the silver hat. I punched a 12 mm (1/2") hole in a piece of paper and was able to slide that over the discs to protect the hat while I painted them.
Step 30: Put in the Prop
Slide the prop in place.
Squeeze a drop of superglue on a tray.

Dip a skewer into the drop so that you get just a tiny bit on the end.
Place the tiny bit of glue on the end of the spindle.
Push the cap into place.
It is very important to use a tiny amount of glue, otherwise, it can get on the spindle and keep the prop from spinning properly.
Step 31: All Done!!
Finally, you are done! You have every reason in the world to be really proud of yourself. You just made something amazing.

Thanks for hanging out with me!

If you'd like to see more of my projects you can find me here:
Subscribe to my YouTube Channel
Follow me on Instagram
Check out my pattern shop